The Practical Guide to Making Company Marketing Videos

It’s no secret that video is growing in importance within the marketing world, and that holds true for B2B companies as well as B2C.
During the last few years, video has become not only a way to host meetings and webinars but a way to communicate informative content that helps viewers learn and make informed buying decisions. Some of the most common industrial company and marketing videos being produced are corporate overviews, corporate culture videos, how-to videos and product demos.
More than ever, people want to research and learn as much as they can on their own before talking to your sales department, making it all the more important to create professional-looking and educational video experiences. Not every marketer has access to professional videographers, however, and many end up doing a lot of the video work themselves, learning as they go. To help you more easily create your own company videos, this article will share the basics of shooting, editing and posting video, along with some helpful tips for video calls and meetings. The contents of this article include:
Preparing Your Environment for Filming
The first step in making sure you’re on the path to creating a professional-looking video is to have a proper background and lighting. Have you ever been on a video call and noticed that someone’s room is so dark you can barely see them? Or you can see them, but they’re in the kitchen and you can also see the pile of dirty dishes in the background? This can leave a bad impression. It’s important to avoid mistakes like these, whether you’re shooting a marketing video or hosting or attending a video call. Aim for a background that looks professional, in a quiet room with a door that you can close. You may want to hang a “do not disturb” sign on your door if there’s a chance you could be interrupted during filming, and of course turn all of your notifications off.
Lighting Basics
The lighting you use can vary depending on your camera, but it’s always an important factor when creating video. Types of lighting vary from expensive studio panel lights all the way to natural window light. Orienting yourself so that you’re facing windows with filtered light provides natural and flattering lighting; windows behind you can cause a lot of distracting contrast. When possible, it’s a good idea to use artificial lighting in a controlled room. This allows you to set the brightness and warmth exactly the way you want. This also lets you film at all hours without risking low or inconsistent light. Ring lights are a popular tool for setting up professional lighting for your video.
No matter which light you choose, aim for natural skin tones, and use the principles of key lighting. For advanced setups, you can take into account the principles of the three-point light setup. For additional information on both of these techniques, you can reference this article by Studio Binder.
Camera Angle
A sometimes overlooked step when setting up to shoot video is the camera angle: where the camera should be positioned in relation to your subject. You need to consider both the level and the angle of your camera in order to convey the feeling you want.
The most common type of shot is the eye-level shot, and for the purposes of a webinar, company video, interview or promotional video it’s especially popular. The eye-level shot doesn’t impose any judgment on a subject and is the most natural for the viewer. The eye-level shot is most effective for connecting with your viewer and giving them the sense that you’re talking directly to them.
For a rundown of different types of camera angles, watch this helpful video by StudioBinder.
Backgrounds and Backdrops
We could write a completely separate article on how to select the perfect background for your video, because there are just so many options and different scenarios. In this article we will focus on the different background options to use for an eye-level marketing or explainer video.
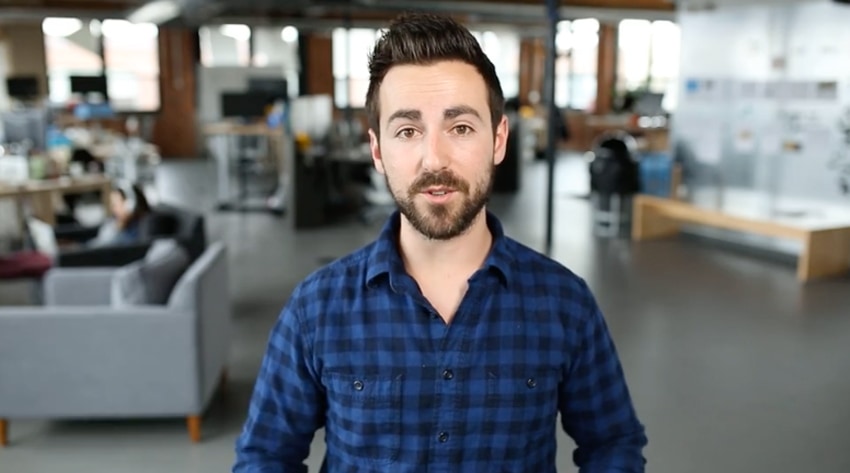
When possible, it’s great to use an office or workplace to convey authenticity, as long as that place is clean and appealing. We recommend slightly blurring out the background of the shot if it doesn’t pertain to the story. This keeps attention on the subject while hinting to the viewer that you are in a business setting. These types of shots are more appealing and natural because they mimic how your eyes focus on a subject in real time.
Here is an example of what this type of shot looks like.

Another option is a solid-colored background. This is a good choice if you want to make sure your videos have a consistent and simple look and feel, you want to convey a neutral message, or you just don’t have access to an office. Most commonly, these backgrounds are seamless photo paper backdrops. They come in many different colors and are very cost effective. Seamless background paper is great for companies that don’t have a large video budget but still want to create professional-looking video. Even a large company like HubSpot utilizes photo paper as a backdrop for some of their academy training videos.

In lieu of seamless paper backgrounds, work with what you have. Look around for empty walls in muted colors, or possibly a tidy shelf of books and knick knacks. With the right lighting, these types of backgrounds can look professional in no time.
Below is an example of utilizing a home for great-looking video.

Picking the Right Camera
If you’re recording video in much the same way as you’d do a Zoom or Google Meet meeting, your laptop’s built-in camera might do the trick, with careful placement and lighting. If you’re aiming for something more advanced, you might need to purchase a camera.
If you were to ask five different experts for their camera recommendations, they would all tell you generally the same thing. They would tell you that it depends on how much you’re willing to spend, how much you’re willing to carry around, and personal preference.
Most importantly, you need to understand the types of videos you plan to make. If you’re a motorsport company wanting to show off a new dirt bike, you’d probably want to look into an action camera. If you’re a rubber parts manufacturer wanting to create videos showcasing your processes and conducting employee interviews, you might want a 4K mirrorless camera with built-in stabilization. And if you’re a heavy crane manufacturer wanting to showcase your massive cranes at work, you’ll want to consider a 4K drone and getting your Part 107 aviation license.
What about your cell phone? With each new release of technology, this becomes a more viable option. By implementing proper filming techniques and using additional gear like a tripod, a gimbal for stability during moving shots, and good audio accessories, you can produce medium-to-high-quality videos.
Because this article focuses mostly on company marketing videos and best practices for filming webinars and video calls, we can’t forget to talk about webcams. While a standard video camera can be used in every situation (with a little technical know-how), webcams are recommended as a cheaper substitute in the context of webinars, video calls, explanatory videos and some marketing videos. There are many high-quality webcam options on the market, and they are easy to connect with audio recording equipment. The biggest benefit of a webcam is that they are much more “plug and play” than a video camera and require less technical experience to use. When deciding between webcams, the questions remain: how much do you want to spend and what’s your preference based on the videos you’ll be making?
Here’s a list of our favorite video recording devices in each category mentioned above:
4K Mirrorless Camera:
Panasonic LUMIX GH5 4K Digital Camera
Action Camera:
GoPro HERO10 Black
Drone:
DJI Mavic 3 – Camera Drone
Phone:
iPhone 13 Pro
WebCam:
Logitech StreamCam
How To Get Better-Sounding Audio in Your Videos
Capturing audio is an often overlooked and sometimes complicated aspect of creating video. Technology is slowly beginning to merge audio and video together, but in most cases you’ll still need to have a dedicated video device and a dedicated audio device to create professional looking and sounding video.
The first thing to consider is whether you want the audio device to connect directly to your camera, making life easier when it comes to editing. Or do you have the technical experience and skill to be able to match up audio and video when each is recorded separately on a dedicated device? Both are perfectly viable options that require different skill sets and knowledge. If you’re more comfortable with the live filming side of things and less comfortable editing, then you might lean toward the first option of connecting devices. If you’re a whiz when it comes to editing your videos but less comfortable filming, then using a basic audio recorder might be simpler for you.
Audio experts could talk to you for hours about the different kinds of gear they use in different situations, but it all comes down to what you’re comfortable with and whether the quality is what you’re looking for. For more information on the different types of audio equipment and the basic steps to get started, watch this introductory video by B&H Photo and Video.
We’ve gathered a list of our favorite audio devices for you to consider when making your own videos.
Zoom H4n Pro
Tascam DR-10L
Rode Wireless GO II
Rode NTG Shotgun Microphone
Editing Your Company Videos
You’ll need to choose editing software and spend some time learning how to use it. These are the three options we would recommend you check out:
Adobe Premiere Pro
Final Cut Pro – Apple Store
iMovie – Apple Store
Adobe Premiere Pro is a great choice if you’re looking to regularly produce high-quality videos and have the time to really own the work of video creation. It has a lot of capabilities, but learning to use it well takes time. On the other end of the spectrum you have iMovie, which has more limited capabilities, but it can be easier to learn, and it’s free.
At Windmill, we use Adobe Premiere Pro, for the videos that we shoot and edit ourselves, and editing work for footage provided by clients.
Where To Host Your Video and How To Upload It to Your Website
There are two main options for uploading a video to your website. You can upload it directly, which can hinder page speeds and take up space within your media library, or you can look to a third-party hosting provider and embed your video onto your site, saving you space and keeping page speeds optimal. It’s no secret that YouTube and Vimeo are the biggest players in this field. We’ve written an in-depth article on how to pick between YouTube and Vimeo.
Conclusion
Video has become increasingly popular over the years, and there is no sign it’s going away any time soon. It’s only advancing. This article just scratches the surface of the process of creating professional company videos. There’s always more to consider and more to learn, but we recommend diving in and giving video creation a try.


